8 minute read
Case study: 2013 VW Phaeton automatic tailgate malfunction – AKA Tales from the nonfunctional crypt


BY GARETH DAVIES CAE AMIMI, DIRECTOR EURO PERFORMANCE
A few months ago, one of our local independent garages got in touch seeking advice regarding a VW Phaeton Automatic tailgate. They talked me through the symptoms and repairs that had been carried out and we agreed the best course of action would be for us to take a look and clarify whether a basic setting or initialization was required, or whether the problem resided deeper.
Our simple evaluation process began. The first step was to capture as clear an understanding of the customer’s original complaint and ANY relevant information, such as timelines and behavior patterns, to ascertain what testing and repairs (if any) had been carried out to date and to establish a budget for our investigations before updating with my findings.
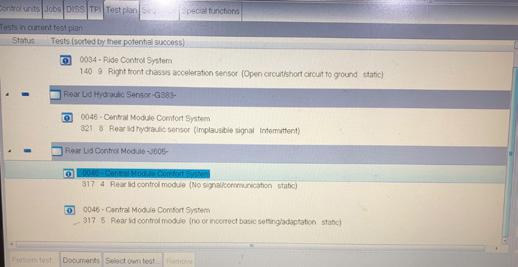
Acquisition data complete, I got the vehicle in to take a look. Initially, I began with a Full Diagnostic trouble code report with a scan tool and a brief observational walkaround to check for any ‘stand out’ details. I decided, given the high specification of the vehicle in question, that I’d go straight in with the manufacturer diagnostic tool, ODIS. I knew that this would be information-rich with diagrams and schematics relevant to this vehicle, and if the nature of the fault depicted a handshake or ‘teach in’ was required, the tool would reduce ‘faffing time’.
After reviewing the diagnostic report, I took some time to analyse the stored DTC’s, the job notes acquired and the work previously carried out by the independent garage. I find this stage can be the difference between becoming lost in a diagnostic job and making good efficiency. It’s a great settler to draw patterns between the reported symptoms and what the car is logging in terms of faults, before getting lost in a set of tests, which may, or may not, be relevant to ascertaining the fault/fix.
Customer reported issues: Tailgate has no functionality, tailgate showing as open on driver information display.
Tests or repairs carried out: Forced entry to boot via created access panel in rear bulkhead, boot lock damaged to open boot, chaffed wiring harness found and repaired with new full genuine tailgate loom, new boot lock mechanism/ motor replaced but after test fit, removed as no functionality restored even after these repairs.
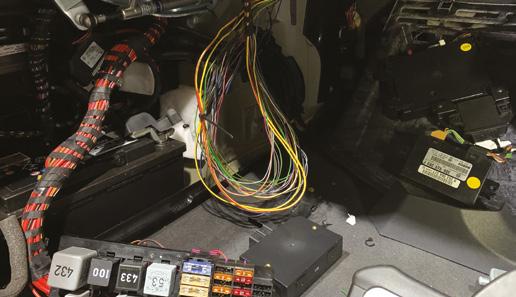
Looking at the report, there were a cluster of faults all reporting problems with the rear lid central locking motor (plausible, as the old damaged one was connected for fear of damaging the new 650 VW item), but other than that, the car appeared reasonably well. The report also showed some DTC’s that at face value, were not likely to be relevant to the issue. I didn’t want to waste time on these at this stage. A quick inspection revealed a competent at ‘face value’ wiring repair, and the car had been left in a stripped state to assist with our investigation.
After pulling up the wiring diagram, various key suspects were found on the diagram and a basic test plan (of my own, rather than AI on ODIS) was created having familiarized myself with the layout of the system. Which, interestingly, is significantly different on the Phaeton, compared to more common visitors from the Audi Avant Fraternity with ‘Deck Lid Control’, that we see a fair volume of in a faulty state.
What did I need to validate? What needed to be working that wasn’t? Where do the instructions for these functions come from?
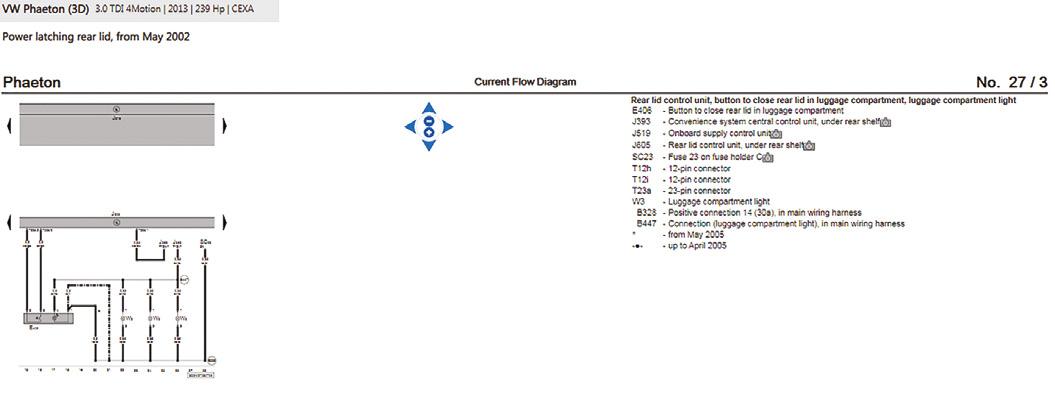
I began testing by establishing whether I had any functionality, by any means, of trying to operate the tailgate – which can be done via the keys, the switch in the driver’s door card, the button to close the lid mounted internally in the tailgate (it was open as the previous garage had forced entry), and the emergency key switch within the rear badge. No method of operation yielded any functionality. My next test was to try and execute output function via the diagnostic tool. This made for the first interesting observation. The wiring diagram and workshop manual referred to a separate rear lid control unit
physically fitted, but communication with the unit is accessed diagnostically via the master control unit ‘Central Convenience’ ECU in a master and slave type setup. I had a good look around both control units serially and the various options available for outputs and basic settings actioned by the diagnostic tool. It was clear the live data was not happy with the reported conditions and states of the hall sensors on the position of the tailgate and, despite a few attempts with the old lock, a new lock in place, and running the output test with a confirmed successful action by the diagnostic tool, I still had no output/ activity at the rear lock.
With this is mind, my next test was to confirm a successful wiring harness repair by the previous garage. This was quickly ruled out as good, I was able to successfully carry a load across all repaired sections. The plot thickened – it was time for a cup of tea.
After a little detour, my attention turned to checking Technical Service Bulletins for any light that could be shed on this issue. Foolishly, I had discounted the prospect of a TSB being relevant, maybe because of the very nature of the faults and the seemingly obvious defect found by the other garage. Upon checking TSB’s, I came across two, one was superseded by a later, more detailed one. This made for an extremely useful read, documenting step by step DTC analysis and comparison, and test/replace steps as required. In short, it begins with the harness issue and if that doesn’t fix it replace the lock, and if that doesn’t fix it, replace the control unit. It is more technically and eloquently put, but that’s the sum of it.
The exact reasoning of why is not documented, but my thoughts now turned to potentially a domino effect fault cascading from a chaffed wire, to excess current draw from a failing lock, potentially resulting in internal damage to individual micro components within the controlling unit.
Armed with a lot more information, particularly relevant to my presented faults, and internal technician pressure to solve the riddle, I had two options. 1 – Condemn a control unit by medium of TSB and manufacturer led process (not to be argued with sometimes in my experience) or 2 – Carry out further testing to be as factually sure on my repair advice. The second option for me had more appeal, particularly given the potential bill they could be facing for control units and coding, and the previous investment level already agreed to get to the point I became involved.
Continued on page 63…
Take Charge

Keep your business moving with Ring’s Professional Lithium Jump Starter.
Compact yet powerful enough to jump start 8L Petrol engines or 6L Diesel engine vehicles Easy to handle being 75% lighter than equivalent lead acid jump starters Maximum safety and protection built in Always ready to go with rapid recharge and docking station during storage

Is there a test that can be carried out now, that I might carry out if the advice of replacing the control unit does not fix the fault? A technique taught on a training course I attended that has stuck with me, and one that could have been a savior in some previous jobs as a diagnostician. I also knew that I had the added pressure of providing as complete a fault picture as possible, despite this being my first look and involvement with the job.
After rechecking wiring diagrams, I picked some test subjects. The first was a check of the hall sensor on the master boot Ram/motor assembly. A quick check revealed power, ground and signal all present and correct on a voltmeter, at the control unit plug of the wiring harness when the boot was gently moved through the open-closed spectrum of movement.
The second test was manipulation. If I can drive the actuators that are not currently being driven by the control unit, will that give me the confidence I need to be sure the control unit will be the ‘fix’? Can this identify the suspected weak link? Identifying the rams were a 12v medium/high current circuit (diagrams and gauge thickness wiring), I took control of the motor and drove it in one direction, followed by reverse. This test confirmed the boot would close, albeit slower than it should, and open. Even more satisfying was when the boot approached closing point (yes with all 6ft and 16stone of me inside the boot, maybe should have thought more about that at the time) the lock began to work and carry out the necessary soft close, pull-down motion on to the striker.
The superseded control unit was authorised, ordered and promptly fitted and adapted. We finally had a repaired tailgate. Confirmation before partial reassembly was that the tailgate worked from all control mediums, and that DTC’s cleared with no return.
Summary:
Not one part or fix was directly needed to be complete. Credit to the independent that was first tasked with the job, as the wiring loom, in my opinion, was likely the originator. They reported, during later progress updates, that it had been faulting intermittently for a while, but the customer didn’t get it looked at. Understandably, someway down a diagnostic job road it’s easy to become nervous at the prospect of more customer expenditure. Without the necessary manufacturer information and probable causes, such as domino effect failures or blanket component change ‘fixes’, it would have been a hard ‘gut feeling’ sell in terms of repairs to the customer, particularly when the rare Phaeton in repair terms is no less affordable now, than when first on sale at a premium price tag.
EFFECTIVE AGAINST VIRUSES, SPORES, FUNGI & 99.9% OF ALL KNOWN BACTERIA
ANTI-BACTERIAL AIRCON BOMB Powerflow
MEDICAL GRADE

• Powerful deodorizer incorporating biocide, anti-microbial, anti-viral, anti-spore and anti-
Powerful Anti -Viral Protection including Corona Viruses fungal properties
• Effectively sanitizes aircon systems & keeps interior smelling clean & fresh - in 3 minutes!

