5 minute read
MASTERCLASS

Next Article
A FINE LINE
BY PAM HOWARD
Start fall off right with tips and tricks for installing a jacket lining perfectly.
Sewing a lining into a jacket can seem like an impossible task, especially if you consider yourself "lining challenged." But just think of it as sewing the garment you’ve just made in a different fabric and connecting them together, and it won’t be so intimidating. Linings serve many purposes: they conceal and protect the inner construction and seams, allow you to express your creativity or sense of style, and make your jackets more comfortable to wear over other clothing. Depending on your choice of fabrics, they can add warmth or coolness against your skin. They can absorb or wick moisture, or have a bit of Lycra for stretch and comfort.

GENERAL TIPS Consider using "taut" sewing for more smooth or slippery fabrics. Gently but firmly hold the fabric with the same amount of pressure in front of and behind the presser foot as you sew. Be careful not to stretch the fabric, as that it will cause it to ripple.
After sewing each of the seams, press them flat, then open. If desired, use a silk organza press cloth or a Teflon iron shoe to protect the fabrics during pressing.
LINING SUPPLIES
SUGGESTED FABRICS Any of these can be used in solid colors or prints — choose what lets you best express yourself.
• For cooler climates: Cotton or wool flannel, flannelbacked satin
• For warmer climates: Cotton batiste, broadcloth, sateen
• For wicking properties: Microfiber fabrics
• For comfort: lining fabrics with Lycra
• For "fancy" garments: Silk (or silk-like) crepe de chines, charmeuse, washed silk dupioni (washing it removes some sheen and makes it softer), Bemberg rayon (cool against the skin)
MACHINE NEEDLES Size 9/11 universal or sharp needles work well for most lightweight fabrics. Heavier fabrics will require a size 12 or larger universal, sharp or microfiber. It is always a good idea to test your choice of needle on a scrap of fabric to see what works best. Make sure to check that you aren’t getting skipped stitches.
STITCH LENGTH Test to see what works best.
A length of 2.0 to 2.5 works well for silks and silk-like fabrics, and 2.5 length works for most other fabrics.
DRAFTING AN EASE PLEAT
Occasionally, the pattern will include a separate back lining with a wearing ease pleat. This makes the jacket more comfortable to wear and easier for the wearer to move their arms forward without ripping the back lining open. If the pattern doesn’t have that feature, add the ease pleat yourself using the following steps.
• Measure 11⁄2" out from the center-back seam near the neckline. Draw a line parallel to center back. Continue that line down the back and gently curve it, starting just above the back waist marking. Blend the line into the existing seam (A). Center Back
• Make a “V” clip at the top of the back lining pattern to indicate the center back. Measure 2" down along center-back seam, and draw a dot to indicate the end of the ease pleat. • During construction, stitch
from the clip to the dot with right sides together. Stitch the new cut edge using the pattern’s seam allowance.

• Press the center-back vent seam and the seam that connects the linings to the front and back neck facings to one side. All other lining seams should be pressed open.
A
2"
Jacket Back Lining
Waist
ASSEMBLY Most lining sections are cut from the same pattern pieces as the jacket.
PRO TIP: When cutting out the jacket lining pieces, always cut them the same length as the jacket pieces. It’s easier to make the lining shorter than to add length later.
The front or side front lining is usually attached to the front facing. Assemble the lining pieces as for the outer jacket, as shown in the pattern’s guidesheet.
PRO TIP: Leave about 3" of the lining unsewn from the facing lower edge. This area will be finished later.
Clip the lining seam at the back neck facing every inch or so to ensure the lining will press flat. Press the facing seam toward the lining.
Pin the entire lining/facing unit to the jacket with right sides together. Assemble according to the pattern instructions.
Trim the seams to reduce bulk, turn the jacket to the right side, press and understitch the facing where needed.
1 2 3
ADVANCED TECHNIQUES Manufactured jackets are always completely constructed and finished by machine to keep costs down. Since you’re making your own, why not try some next level techniques to finish your linings? This involves some hand sewing, but it will not only add value to the jacket, but will allow more control when stitching key areas.
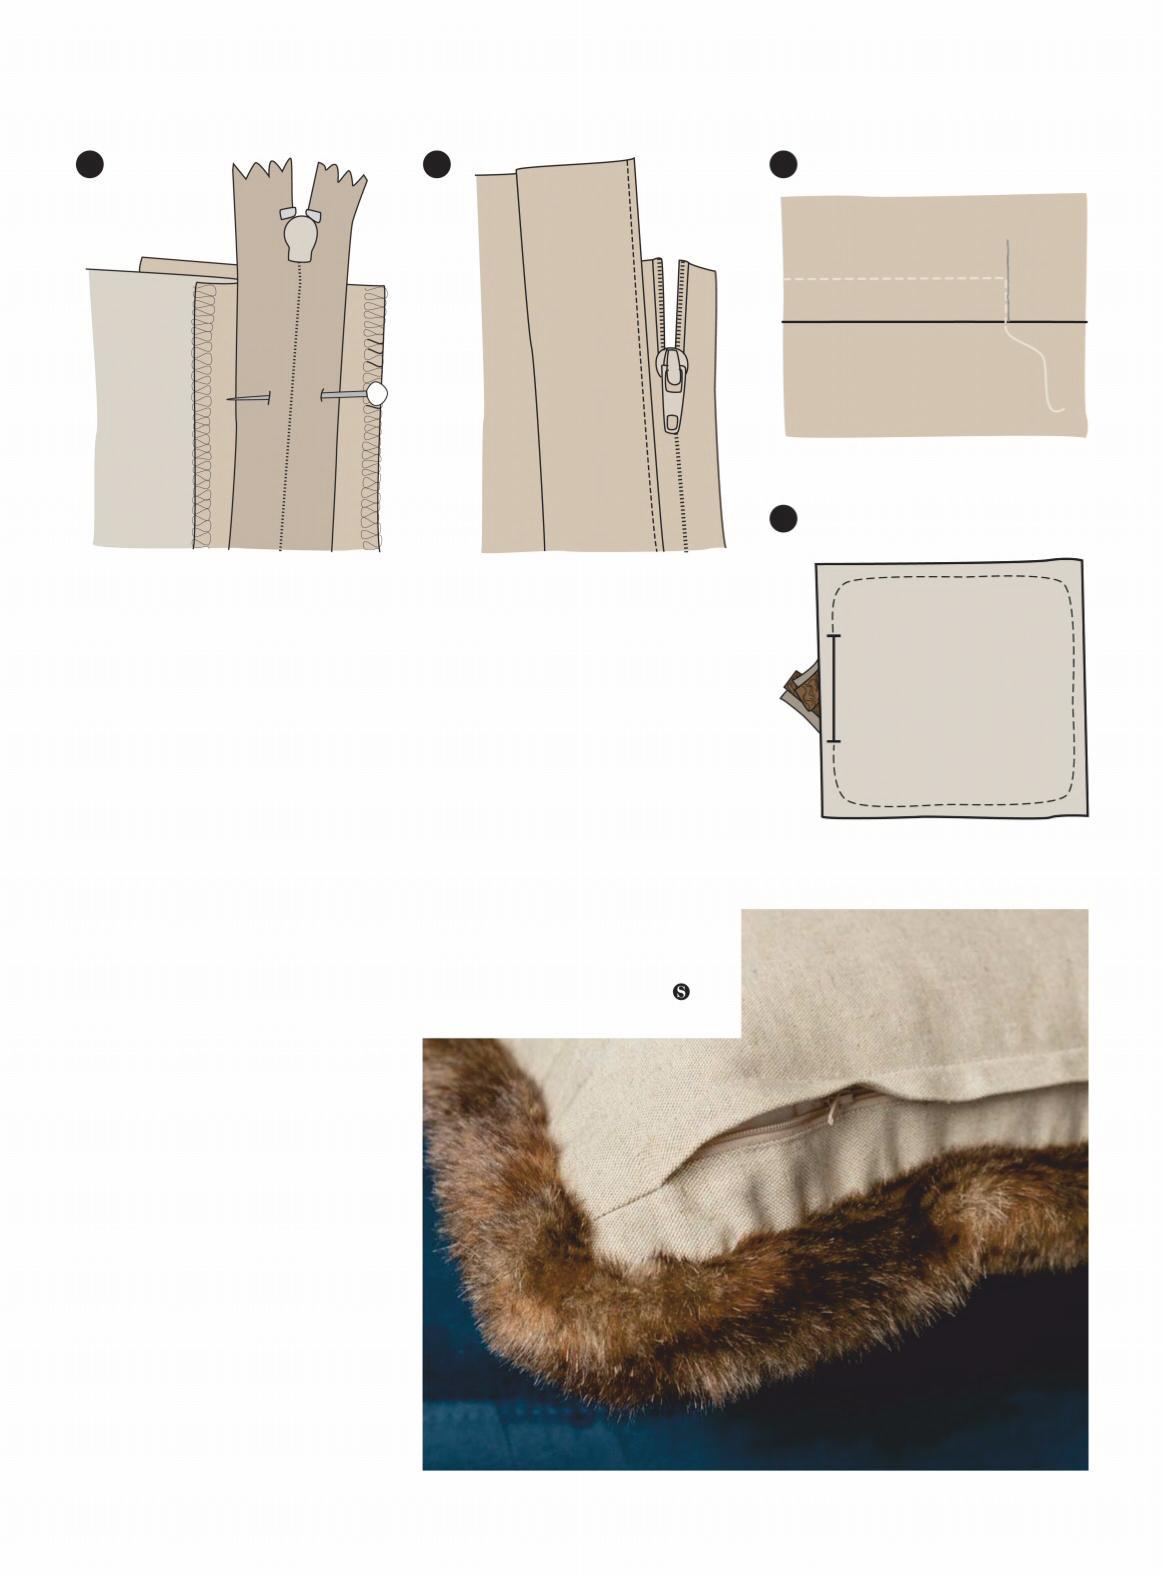
ANCHOR THE LINING Catchstitch the jacket hem and sleeve hems before attaching the lining to the jacket (1). At the jacket hem, fold up the lining 5⁄8" and press.
Place the pressed seam over the jacket hem just over the catchstitching and pin in place across the bottom. Fell stitch or slip stitch the lining in place.

Smooth the lining down to create the ease pleat/jump hem. At the ends of the lining closest to the jacket front, pin in place and hand stitch the area closed (2). This is where 3" of lining at the front facing has been left unsewn.
Tack the back neck facing to the jacket and the shoulder seams.
Tack at the underarms of the jacket and lining down to the jacket waist.
HEMS When you cut your jacket lining out, make sure that the lining is the same length as the sleeves and jacket body. This ensures that the lining won’t be too short.
Use the extra fabric to create an "ease pleat" or "jump hem" at the hems. This will keep the jacket from pulling up when the wearer raises their arms. Bring the lining down to create the jump hem, then press lightly in place (3).
Repeat these steps to hem each sleeve.